
Table of Contents
Do not index
Google Forms is a free and versatile tool that allows users to create surveys, quizzes, and other forms for data collection. At times, you may need a physical copy of the form for various reasons such as for a paper trail, for those who prefer a hard copy, or simply for presentation purposes. While Google Forms does not provide a direct "print" button, you can still print your form with a few simple steps.
Step 1: Access Your Google Form
- Open your preferred web browser and go to Google Forms.
- Log in using your Google account credentials.
- Once logged in, click on the form you'd like to print from the list of your saved forms.
Step 2: Preview Your Form
To ensure that you're printing the version of the form that respondents see (and not the editing interface):
- Click on the "eye" icon, usually located at the top right corner of the screen. This allows you to preview the form.
- This will open the form in a new browser tab/window, showcasing how it appears to those filling it out.

Step 3: Print the Form
For Chrome Users:
- Click the three vertical dots (menu button) located at the top right corner of your browser.
- From the dropdown menu, select "Print."
- Adjust your print settings as needed, then click "Print."
For Firefox Users:
- Click the three horizontal lines (hamburger menu) located at the top right corner of your browser.
- Choose "Print."
- Adjust your print settings and confirm by clicking "Print."
For Edge Users:
- Click on the three horizontal dots located at the top right corner of the browser.
- Choose "Print."
- Set up your print settings and click "Print."
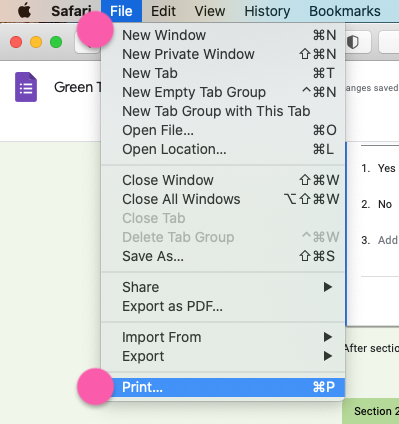
For Safari Users:
- Click on "File" from the top menu bar.
- Choose "Print" from the dropdown menu.
- Customize your print settings and click "Print."
Step 4: Review and Store
Once you've printed the form, review the hard copy to ensure all content has been captured correctly. Depending on your needs, you can store, present, or distribute the printed form.
Tips and Considerations:
- Print Quality: For best results, use high-quality paper, especially if the printed form will be distributed or presented.
- Formatting: Google Forms is primarily a digital tool, so some formatting nuances might not translate perfectly to paper. Previewing before printing can help you catch any potential formatting issues.
- Alternative: Instead of printing directly, you can save the form as a PDF first (an option available in most print dialogues) and then print the PDF if you need additional formatting control.
In conclusion, while Google Forms does not offer a direct printing option, the process is straightforward when using a browser's built-in printing functionality. Whether you're printing for record-keeping, presentation, or distribution, these steps ensure you have a tangible copy of your form in hand.

Written by
Dominic is the co-founder of Fillout.com. He previously worked on engineering & product at Retool. Prior to Retool, he started Cheer ( acquired by Retool in 2020).